富文本编辑框架Prosemirror - 从State到DOM
上一篇文章简单介绍了 prosemirror 内部如何对输入行为作出反应,这一篇文章主要介绍一下 prosemirror 如何完成从 state 到浏览器 DOM 的渲染。
视图
使用 prosemirror 时我们有以下三种定义编辑器内视图渲染的方式:
- 直接使用 nodeType/markType 中的 toDOM 属性,实际渲染由
prosemirror-model提供的DOMSerializer.renderSpec负责 - 使用
nodeView渲染自定义的节点 - 使用
decoration渲染与doc内容无关的节点
从使用者的角度看,我们在 doc 插入了什么内容,dom 中就会渲染出相应类型的内容,这一种方式看起来很像 React 的数据驱动视图的形式。
实际上作者在 state 到 dom 这一层做了很多工作,帮我们把复杂度都抹平了,平时使用起来无需关注到这部分逻辑,但了解这一步过程才能帮助我们在使用时更好地排查问题以及了解编辑器设计的理念。
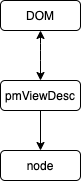
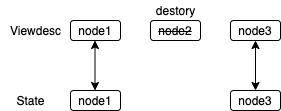
ViewDesc
prosemirror 内部存在一种用于描述视图对象的特殊结构——ViewDesc,他会绑定在编辑器的 DOM 中的 pmViewDesc 属性上,整篇文档的 desc 挂载在 view 实例的 docView 上。作者在文档中没有提供这部分的介绍,但这部分时 view 中最重要的一环,直接与我们看到的内容相关。
ViewDesc 可以看作是 dom 与编辑器 state 的中间层,相当于是 prosemirror 的virtual-dom。ViewDesc 会挂载到相应的 dom 的 pmViewDesc 属性上,并保存相应的 dom 和 node:
prosemirror-view 总共定义了 7 种 ViewDesc:
NodeViewDescprosemirror基本节点的desc,涉及dom与节点的绑定,更新和销毁等
CustomNodeViewDesc- 继承
NodeViewDesc,主要扩展了update的判断,以及暴露诸如select,destroy等的钩子,NodeView对应
- 继承
TextViewDesc- 继承
NodeViewDesc,文本节点的desc
- 继承
MarkViewDescmark的desc,为了简化和可预测,有固定的嵌套顺序
WidgetViewDescdecoration的desc,为state.doc中的数据无关
CompositionViewDesc- 联想输入的
desc,用于表明和保护输入节点
- 联想输入的
BRHackViewDesc- 插入一个
br,用于处理空段落的高度高度问题
- 插入一个
viewDesc 主要提供了匹配节点,获取索引,状态标记等等方法,帮助 prosemirror 更好地处理 state 与 dom 的状态同步
视图更新
对于 prosemirror 来说,视图的更新面向的不是用户做了什么操作,而是面向 state。
用户做了什么操作这部分由 DOMObserver 去处理并应用到 state 上,视图显示的状态与 state 强相关,抹平了处理用户行为的复杂性,简化了更新的处理,但同样会带来一些问题,如对用户的行为无法感知导致的节点不能复用的问题等。
这里我们从插入一个节点开始,探究 prosemirror 视图更新的过程。这篇文章略去 DOMObserver 对 Mutation 的分析,直接从视图更新开始,假设我们已经拿到了新的 state,接下来我们来分析下 prosemirror 是如何将新的 state 应用到视图上的。
更新过程
拿到新的state之后会调用view.updateState(newState),updateState会调用docView.update更新视图。docView 实际上就是 NodeViewDesc 的一个实例,默认的 NodeViewDesc 的更新方法为:
1 | update(node, outerDeco, innerDeco, view) { |
这一步会判断当前节点的数据是否发生变化,如果发生变化,返回 false,会重建整个节点。返回 true 则证明更新成功,进行子节点的更新。
我们在看下updateInner这个方法:
1 | updateInner(node, outerDeco, innerDeco, view) { |
他会先更新外部的 decoration,然后进行更新过程中最核心的处理updateChildren,主要可以分为下面几个部分:
1 | updateChildren() { |
- 首先会根据
docView创建一个updater,主要服务于更新过程(代表当前的节点更新树,拥有子节点的子节点会创建自己的updater)。updater中会匹配docView中的node和descs,从后往前匹配,保存相同的desc(preMatched)和最后一个匹配的desc的offset(preMatchedOffset)。 - 根据
doc和decorations的信息顺序遍历更新,根据匹配到的node和deco的分别调用onNode以及onDeco方法更新。 - 若
updater中有更新,属性changed会被置为true,并进行子节点的渲染(根据实际的dom以及更新后的descs) - 从上面的描述,可以看到最核心的方法在第二部份,我们主要分析下第二步中
onNode做的事情
节点更新
1 | onNode = (child, outerDeco, innerDeco, i) => { |
syncToMarks()用于更新mark。之后便开始对 Node 的更新操作,总结起来就是三步:
findNodeMatch:在updater中寻找是否有viewDesc的node等于当前node(最多匹配当前位置的后四位,不匹配最后一位。至于为什么最多只匹配后四位?可能是出于性能考虑吧,作者没有明确说这一点),若没有,进入下一步
1 | findNodeMatch(node, outerDeco, innerDeco, index) { |
如何确定是同一个节点?
主要就是判断是内存地址,节点属性,decorations,自元素是否是一致的。
1 | matchesNode(node, outerDeco, innerDeco) { |
updateNextNode:若updater的children中当前位置是NodeViewDesc类型,分两种情况- 若在
updater的preMatched中存在且索引 preMatch 加上 preMatchOffset 等于当前 node 再docView.children中index,尝试更新节点,否则视为流转到下一步(这一步这么判断的原因是:如果preMatch+preMatchOffset != index,则证明updater中的数据有误,docView.children中的数据可能有修改,此时以state的数据为准) - 若在
updater的preMatched中不存在,尝试更新节点,否则视为流转到下一步
- 若在
1 | updateNextNode(node, outerDeco, innerDeco, view, index) { |
addNode:这一步就是直接在updater的children中当前索引的位置直接插入新创建的viewDesc
1 | addNode(node, outerDeco, innerDeco, view, pos) { |
渲染到视图
若有需要重建的节点或者删除的节点,updater.changed 会被置为 true,进入 dom 层面的操作。
- 此时的操作以
update后的viewDescs(此时即为docView.children)的数据为准,调整当前视图中dom展示的节点,不会有位置的调整,不匹配就销毁,不存在就重建。
1 | function renderDescs(parentDOM, descs) { |
通过上面我们了解 prosemirror 中视图更新处理的过程,实际上就是 state 到 DOM 的过程,prosemirror 中视图的更新都通过这个过程完成。
更新过程
基于上面说到的规则,我们分析下以下几种输入行为下的更新过程
新增
- 新增节点不能在
findNodeMatch找到,会在当前位置重建,其他的节点都能在旧的docView找到,不用重建
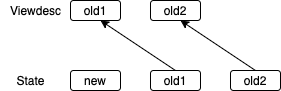
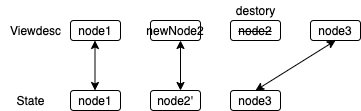
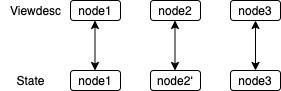
更新
- 与新增节点一致,主要区别在于
updateNextNode这一步,调用就viewdesc的update方法,若update返回false,增视为需要重建节点,否则视为成功更新。若这一步为customNodeView,我们则可以干预这个过程 - 下图展示返回
false的情况,旧的node2会在匹配到node3时被destroy
- 图展示返回
true的情况,所有节点都能匹配到不需要重建
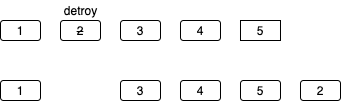
删除
- 删除节点后旧的
viewdesc中能匹配到所有的node,匹配到node会销毁新旧index之间的所有的viewdesc
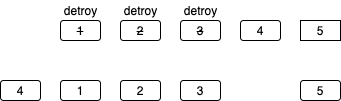
移动
- 移动的情况比较特殊,跟拖动的距离以变化的位置都有关系(主要和
findNodeMatch的处理有关系)- 把节点从前面移动到后面!
这种情况下,重建的节点会是拖动的节点,比如上图的情况中,
findNodeMatch在匹配到3时,拖动的节点2会被销毁,直到遍历到最后被重建。把节点从后面拖动到前面,这时候的处理分情况:
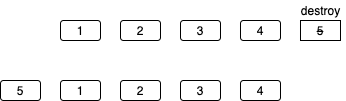
- 非最后一位移动,且距离小于
4
- 非最后一位移动,且距离小于
这种情况下,因为
4在findNodeMatch中可以被找到index: 0, found: 4),会导致0到4之间的节点被销毁。所以这种情况下,1、2、3会被重建,而4不会被重建。最后一位移动或者是距离大于
4
- 这种情况下,由于
5不会在findNodeMatch中找到,所以会在首位重建节点。匹配到4之后遍历结束,销毁剩余节点。所以这种情况下5会被重建。
Mark 更新过程
Mark 的更新过程与 Node 的更新有比较大的区别,Mark 在 state 中是作为 node 的一个属性,而在 ViewDesc 中,他则是作为一个高层级的节点,他可以包括其他节点(包括自己本身),所以他在 state 和 docView 中的结构是不一致的。
比如<p><strong>123</strong></p> :
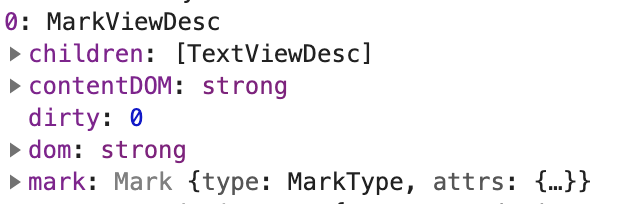

而 prosemirror 在对 dom 做渲染时,是以更新后的 ViewDesc 为准,所以 prosemirror 更新的逻辑是这样:
在每次
onDeco,onNode都会调用SyncToMarks,主要做几个操作
- 当前有
marks,匹配后两位内是否存在相同的mark- 存在:销毁当前位置与匹配到的位置之间的内容,帮当前顶层和位置推入
updater.stack,位置重置为0,把MarkViewDesc放到updater.top,开始对MarkViewDesc中的内容做更新。 - 不存在:创建一个新的
MarkViewDesc
- 存在:销毁当前位置与匹配到的位置之间的内容,帮当前顶层和位置推入
- 当前没有
marks,``updater.stack中有内容,MarkViewDesc出栈,updater状态恢复
- 当前有
所以会有一个奇怪的现象:当后面第二位有同样的 mark 时,会导致中间的节点没有必要的重建:
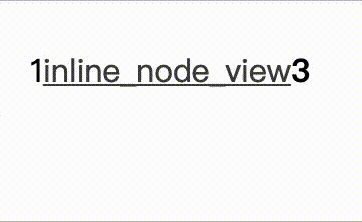
这个过程的变化如下图所示:
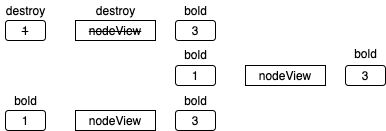
因为 3 和 1 被设置的 mark 一致,所以会匹配到 3,1 和 nodeView 被销毁,这个行为自然是不应该的,作者的解释是为了修复这个Issues,重用 mark 时做了更激进的匹配(这也是一个优化的点,贡献代码的机会 XD)。
总结
这篇文章主要讲了 prosemirror 是如 state 与 DOM 之间的关系,举了几个比较简单的例子,实际情况下,还需要考虑 Decoration 的渲染,mark 与 decoration 与 node 嵌套的渲染,以及 ltr,rtl 的顺序等等的处理,节点的比对和渲染复杂度指数上升。节点复用在这些情况下无法保证,所以开发一些功能时,不应当依赖某个视图的生命周期。
初窥 prosemirror 的渲染流程,与 react 一样,使用 prosemirror 时我们一般不需要关心到视图这一层,这也是现在各主流富文本编辑器框的一套思路。后面的文章会继续探究用户形如何被捕获,state 内部如何更新,索引如何构建等的流程。